Disclosure: Some links in this article are affiliate links. We may earn a commission on qualifying purchases at no extra cost to you.
If you've pulled chicken wings off your pellet grill and been disappointed by soft, pale, chewy skin, you're not alone — and it's not your fault. The problem is almost always the same: the low-and-slow temps that turn brisket into something transcendent will never crisp chicken skin. Not because your grill is broken, but because skin is fat and water, and at 225–250°F, the fat renders slowly while the water never evaporates fast enough. The result is rubbery, not crispy. Once you understand that, the fix is obvious.
This guide covers the complete two-stage method: a low-smoke phase to render fat and build flavor, followed by a high-heat finish to drive off moisture and get real crunch — all without a fryer. You'll also get the moisture-control prep work (dry brine, baking powder, air-drying uncovered) that makes the difference between wings that hold their crunch and wings that go soft the moment you plate them. Everything here works on any pellet grill, from a Pit Boss 700 under $500 to a Traeger Ironwood XL to a recteq.
What You'll Need
For the wings:
- 3–4 lbs chicken wings (flats and drumettes, separated)
- Kosher salt (dry brine — Diamond Crystal preferred)
- Aluminum-free baking powder (Rumford is reliable — check price on Amazon)
- Cornstarch (optional, but extends the crunch)
- Your favorite dry rub (low-sugar if you're finishing at 450°F+)
- Wood pellets — apple, cherry, or a maple/hickory/cherry competition blend
Equipment:
- Wire rack + rimmed sheet pan (for dry brining in the fridge)
- Wing rack or elevated grate (optional but useful)
- Instant-read thermometer — the Thermapen ONE (check price) is the standard; the ThermoPro TP19H is a solid alternative (search on Amazon)
- Wireless probe (optional) — MEATER Plus frees you from hovering
Before You Start — Prep & Timing
The work that separates crispy pellet grill wings from mediocre ones happens before the grill even turns on.
Dry Brine: 8–24 Hours Uncovered
Pat wings completely dry with paper towels. Salt every surface generously with kosher salt — roughly 1 teaspoon per pound. Set them on a wire rack over a rimmed sheet pan, then place uncovered in the refrigerator for at minimum 8 hours, ideally 12–24 hours.
This does two things: the salt seasons the meat all the way through by drawing moisture out and reabsorbing it; the uncovered air-drying dehydrates the skin surface so it crisps rather than steams. Many experienced cooks find that a good overnight salt dry brine alone, without any additives, is sufficient for excellent skin if you nail the two-stage cook.
The Baking Powder Method: What It Does and When to Use It
Baking powder raises the surface pH of the skin (natural alkalinity of ~pH 8), which accelerates Maillard browning. It also reacts with moisture in the skin to form carbon dioxide bubbles, expanding surface area and creating micro-texture that crisps. The science is solid.
The practical formula: 1 teaspoon each of kosher salt, cornstarch, and aluminum-free baking powder per 1 pound of wings. Toss the wings in this coating, then air-dry on a rack in the fridge as above. This is the shortcut if you're working with less lead time than an overnight brine.
Two caveats worth knowing. First: it must be baking powder, not baking soda — baking soda gives a metallic, soapy bitterness that ruins a batch fast. Second: a minority of serious BBQ cooks find that baking powder gives skin a slightly papery texture and skip it entirely, relying on a plain salt dry brine plus proper heat. Both approaches work. If you're doing your first batch, the 1:1:1 formula is a forgiving starting point.
A note on rubs: if you're applying a BBQ rub, keep the sugar content in mind. High-sugar rubs will scorch at 450°F. Save the sweet rubs for the low phase, or go with a savory-forward rub that handles high heat.
Step 1 — Preheat and Set Up Your Grill (Low Phase: 180–250°F)
Pull your wings from the fridge about 20–30 minutes before you're ready to cook. Cold wings off the grill grate tend to stall the skin-rendering process.
Set your pellet grill to 225–250°F. Most setups run well at 250°F for this phase — it's hot enough to render fat efficiently without pushing into territory where the grill starts behaving more like an oven than a smoker. At 180°F you'll get maximum smoke output, but fat rendering slows considerably; 225°F is the better balance.
Load your wood pellets — more on selection below. Let the grill come fully to temperature and stabilize before loading wings. A cold or still-climbing grill will just add uncontrolled variability.
On hopper level: Before a wing session, check that your hopper is at least half full. Running out of pellets mid-cook during the high-heat finish is a very common reason wings come out underdone or pale. Check it now rather than during the cook.
If you have a Cave Tools wing rack (4.4/5 across 2,752 reviews), use it — vertical orientation gives 360° airflow, keeps skin off the grate, and reduces flare-up risk. If not, a standard wire rack elevated off the cooking grate works, or place wings directly on the grates with space between each piece.
Step 2 — The Low-Smoke Phase
Load the wings onto the grill and close the lid. Run the low phase at 225–250°F for 45–60 minutes, or until the internal temperature in the thickest part of a drumette reads approximately 125°F.
The Traeger official guide specifies this sequence verbatim: smoke until 125°F internal, then preheat to 450°F and cook to 175°F. That's a reliable anchor.
What's happening during this phase: subcutaneous fat (the fat layer directly under the skin) is rendering slowly, basting the meat from the inside. At the same time, the smoke is absorbing into the meat. Because smoke output from a pellet grill is highest in the 180–225°F range and drops off sharply as the fire "roars" at higher temperatures, you're capturing most of your smoke flavor here.
Don't rush this phase. Wings pulled off the low phase at 90–100°F internal and cranked to high heat skip the fat-rendering window and the skin stays fatty and soft rather than crisp.
On a convection-style pellet grill, flipping is optional — the hot air circulates and cooks all sides. If your grill has hot spots near the firepot, rotating wings helps even out the cook. Otherwise, leave the lid shut.
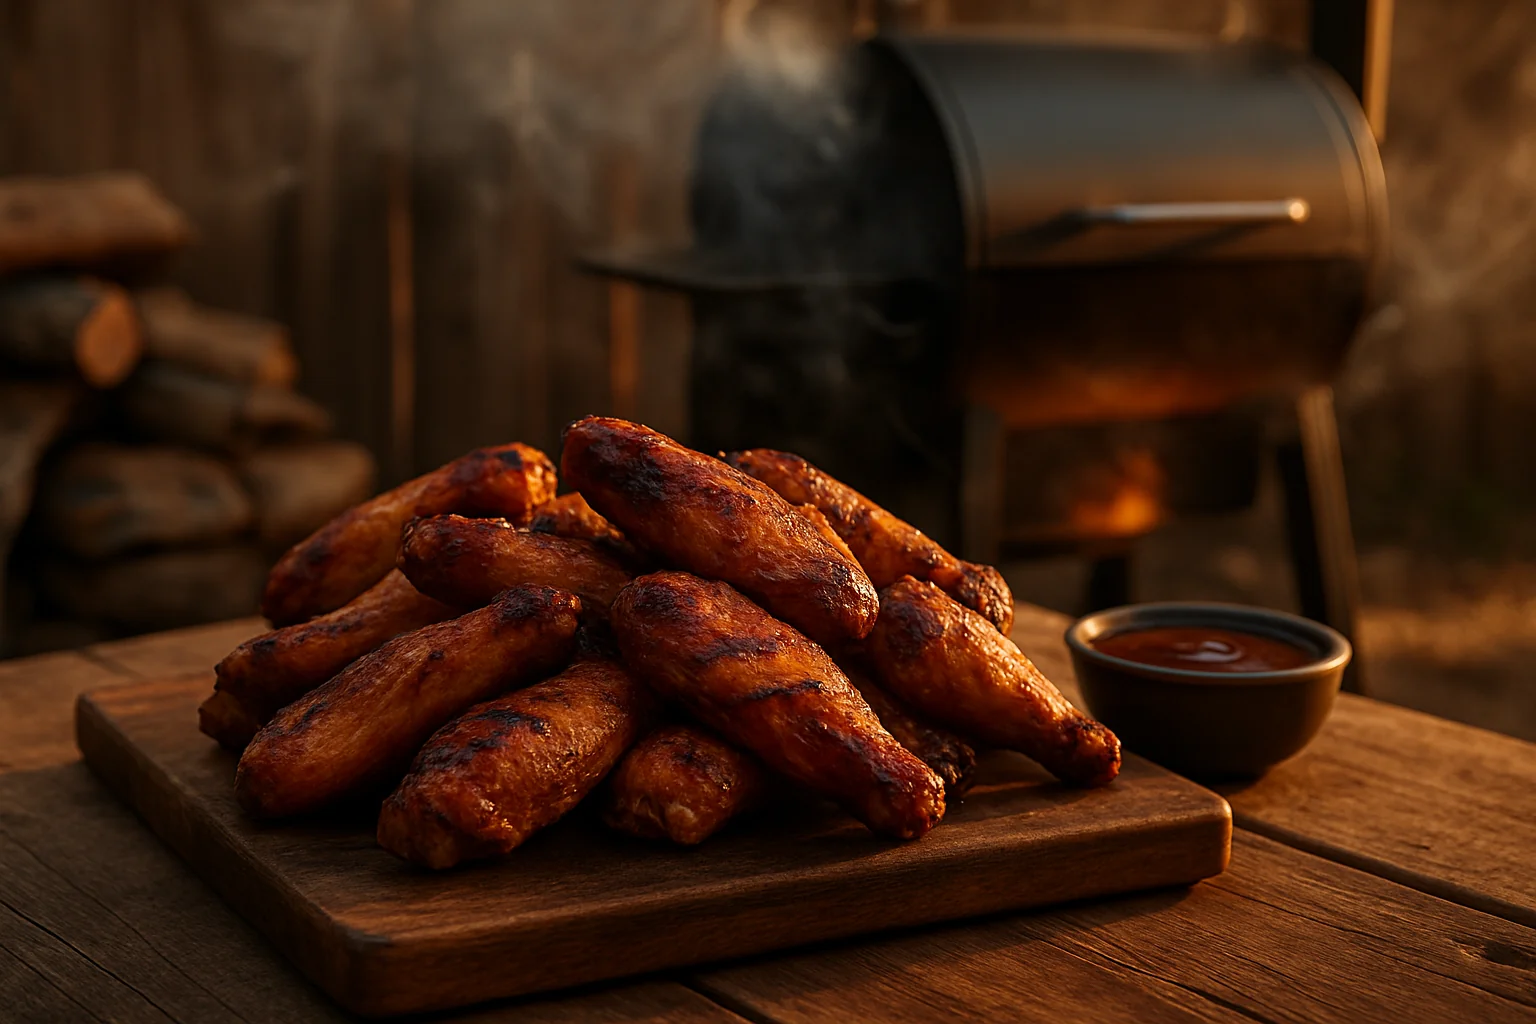
Step 3 — The High-Heat Finish (375–450°F)
This is where the crunch happens. When wings hit ~125°F internal, either crank your pellet grill to 400–450°F and let it stabilize, or transfer wings to a separate higher-heat setup.
Run at 400–450°F for 15–30 minutes, checking internal temperature and skin color until you get the crisp you're after and internal temp reads 175°F or higher. At 175°F+ the collagen in dark meat has broken down further, which is why wings at this temp are more tender and less rubbery than wings pulled at exactly 165°F.
Why 375–450°F and not lower? AmazingRibs documented this directly in their Timberline 850 review: at 325–350°F, wing skin came out "pale and chewy. Not exactly rubbery, but not what we wanted." Their fix was to push to 400°F. Even premium convection grills struggle to crisp skin below 375°F.
Some notes on what your grill can actually do here:
- Traeger Pro 575/780 and most mid-range grills: max convection is 450–500°F. Traeger Pro units ship capped at 450°F and unlock 500°F via a WiFIRE firmware update. 450°F is enough; 500°F is better.
- Pit Boss with Flame Broiler: the slide-plate direct flame adds a localized high-heat zone that crisps skin fast — open it for the last few minutes and watch carefully.
- Camp Chef Woodwind with Sidekick/Sear Box: the 30,000 BTU propane attachment reaches ~800°F and is one of the best finishing tools in the pellet grill world for exactly this kind of cook.
- recteq Bullseye RT-B380: Smoked BBQ Source called it "a chicken wing machine" specifically because it handles both phases well. Standard range 200–500°F; "Riot mode" reaches 750°F but that's a dedicated direct-flame burst, not continuous operation.
- Z Grills 700-series: max ~450°F indirect convection — solid for the finish, no direct-flame option.
The honest reality: 500°F convection-only is marginal for crispy skin. It works, but grills with direct-flame options (Pit Boss Flame Broiler, Camp Chef Sidekick, recteq Bullseye) have a structural advantage on the crisping phase. For a full breakdown of how these brands compare, see our Traeger vs Pit Boss and Traeger vs recteq guides.
Step 4 — Check Internal Temperature and Pull
Use an instant-read thermometer inserted into the thickest part of the flat or drumette, avoiding the bone — bone conducts heat and reads several degrees high, which will fool you into pulling undercooked wings.
Temperature targets:
- 165°F: USDA FSIS safe minimum. Wings are food-safe at this temperature.
- 175°F: The practical pitmaster target — recommended by Pit Boss recipes and AmazingRibs (170–175°F). Fat renders further, skin crisps better, meat is more tender.
- 185–195°F: Girls Can Grill recommends 195–205°F; recteq recipes suggest 185–190°F. At this range, wings are very tender but have a bit less snap in the skin. Personal preference.
The short version: pull at 175°F for the best combination of crispy skin and tender meat. If your wings are thin or on the small side, check early — small drummettes can move from 165°F to 185°F in a few minutes at 450°F.
Step 5 — Sauce (Or Don't)
This is where batches go wrong even after a perfect cook.
If you want sauced wings: Apply sauce in the last 3–5 minutes of the cook, not before. Sugar in BBQ sauce burns fast at 400°F+. Even buffalo sauce (mostly butter and hot sauce) can re-hydrate skin and turn it soft if applied too early. The moment sauce hits crispy skin and sits, it starts pulling moisture back in. Sauce, pull, serve immediately.
If you want maximum crunch: Serve the rub dry, sauce on the side. This is the more reliable route if you worked for crisp skin and don't want to lose it on the plate.
Never sauce before the high-heat phase — you'll burn the sugars, and the skin will steam under the sauce rather than crisp. This is one of the more common mistakes in recipes that call for saucing at the 225°F stage.
Wood Pellets for Wings: Keep It Mild
Poultry takes smoke faster than beef or pork and over-smokes more easily. Stick to mild fruit woods as your base.
Apple is the safest default — the mildest, slightly sweet, forgiving on poultry. Traeger Apple Wood Pellets 20 lb (4.7/5) are clean and widely available. Bear Mountain Apple 40 lb 2-pack (4.7/5) is better value if you cook wings often.
Cherry is the next step up — a bit deeper smoke, excellent mahogany color on the skin. Works well as a straight swap or blended 50/50 with apple.
Hickory is a valid accent flavor but not your main event on poultry. A roughly 1:3 ratio (one part hickory to three parts apple or maple) adds depth without bitterness. Run straight hickory on wings and you'll likely find the smoke too heavy.
Competition blends (maple/hickory/cherry) are a practical all-purpose choice. Traeger Signature Blend 20 lb (4.7/5) and Pit Boss Competition Blend 40 lb (4.7/5) both work well. For a full comparison of pellet quality and burn characteristics, see our best wood pellets for smoking guide.
Mesquite: leave it for beef. It's intense enough on brisket; on a small cut like wings at the volumes you're running, it overwhelms fast.
Method Decision Guide: Which Approach Fits Your Situation
| Your situation | Best approach |
|---|---|
| Have 12–24 hrs lead time | Plain salt dry brine uncovered, skip baking powder |
| Have 2–4 hrs lead time | 1:1:1 salt/cornstarch/baking powder per lb |
| Want maximum smoke flavor | 180–225°F low phase for 60–75 min, then 400°F+ finish |
| Want maximum crunch | 250°F low phase for 45 min, then 450°F+ finish |
| Grill maxes at 450°F (most pellet grills) | Two-stage method works; budget 20–30 min at max temp for finish |
| Grill has direct-flame option (Pit Boss Flame Broiler, Camp Chef Sidekick) | Use it for the last 3–5 min of the finish; watch carefully |
| Grill can't reliably hold 400°F | Smoke to 125°F, transfer to cast-iron skillet or oven at 425°F to finish |
| Want guaranteed crunch regardless of grill | Smoke to 100–110°F, then deep-fry at 350°F to 175°F (air-fryer works too) |
Common Mistakes to Avoid
Running a single low temp the whole cook. At 225–250°F alone, fat renders slowly but surface moisture never evaporates. The skin stays soft. Two stages are not optional — BBQ Report calls it "non-negotiable."
Pulling at exactly 165°F. Wings are food-safe at 165°F, but dark meat at 165°F still has unrendered fat and uncollapsed collagen. The meat is technically cooked; it isn't at its best. Target 175°F for the texture you actually want.
Using baking soda instead of baking powder. Baking soda raises pH far higher and leaves a metallic, soapy off-flavor that doesn't cook out. If your crispy wing recipe tastes wrong, this might be why.
Saucing early. Sugar burns above 325°F. Sauce also pulls moisture back into crispy skin within minutes of application. Sauce in the last 3–5 minutes or after pulling.
Running out of pellets during the high-heat finish. A pellet drop-off at 450°F means the grill cools fast while you're trying to crisp skin. The wings stall in a marginal temperature zone and come out pale. Check hopper level before you start.
Heavy hickory or mesquite on poultry. Mild fruit woods exist for a reason. The smoke flavor from a pellet grill is already subtler than an offset — going heavy to compensate and choosing mesquite is the wrong lever to pull.
Not checking for hot spots. The zone directly over the firepot runs hotter. If some wings are crisping fast while others are barely browning, rotate them or use the upper rack to create distance from the heat source. This is especially relevant on grills without strong convection.
The Air-Fryer/Deep-Fry Finish (Optional)
Some cooks smoke wings low to 100–110°F internal, then finish in a deep fryer at 350°F to 175–185°F. recteq's official "Smoked Fried Chicken Wings" recipe uses this sequence. It works, and the crunch is essentially guaranteed.
It's also extra equipment, hot oil, and the thing this article said you wouldn't need. Present it for what it is: the nuclear option for crunch, useful if your grill genuinely can't hit 400°F consistently or if you're cooking for a crowd where perfect consistency matters more than simplicity. For most backyard cooks with a halfway-decent pellet grill, the two-stage method on the grill alone gets you 90% of the way there.
Frequently Asked Questions
Q: What temperature should chicken wings be cooked to on a pellet grill?
The USDA FSIS sets 165°F as the safe minimum internal temperature for all poultry including wings. In practice, most pitmasters target 175°F for better texture — at 175°F the collagen in dark meat has broken down further, making wings more tender and less rubbery than at exactly 165°F. Insert your thermometer into the thickest part of the flat or drumette, away from the bone.
Q: Why are my smoked chicken wings rubbery?
Almost always one of two causes: you cooked at a single low temperature without a high-heat finish, or your grill never reached a high enough temperature to evaporate surface moisture. Chicken skin is fat and water. At 225–250°F the fat renders, but the water doesn't evaporate fast enough to crisp the skin. The fix is the two-stage method — smoke low, then finish at 375–450°F until the skin visibly crisps.
Q: Does baking powder actually make chicken wings crispier?
Yes, with caveats. Baking powder raises the skin's surface pH, accelerating Maillard browning and creating small gas bubbles that expand the skin's surface area. The 1:1:1 ratio (1 tsp each of kosher salt, cornstarch, and aluminum-free baking powder per pound of wings) is a reliable starting point. Some cooks prefer a plain overnight salt dry brine and find baking powder gives a slightly papery texture — both approaches work when combined with proper heat.
Q: What wood pellets are best for chicken wings?
Apple is the safest choice — mild, slightly sweet, forgiving on poultry. Cherry adds a bit more depth and excellent color. Competition blends (maple/hickory/cherry) are versatile. Hickory can work as an accent at roughly a 1:3 ratio with apple or maple, but avoid running straight hickory or mesquite — poultry takes smoke fast and bitter over-smoked wings are a common result.
Q: Can I smoke wings on an entry-level pellet grill?
Yes. Any pellet grill that can reach 400–450°F can execute the two-stage method. Grills with a direct-flame option — Pit Boss Slide-Plate Flame Broiler, Camp Chef Woodwind with Sidekick — have an advantage on the crisping phase, but they're not required. The prep work (dry brine, baking powder, air-drying) does more work than the grill tier.
Q: When should I add sauce to smoked wings?
In the last 3–5 minutes of the cook at most, or after pulling. Sauce applied earlier burns at high heat and re-hydrates the skin you worked to crisp. For maximum crunch, serve sauce on the side and let people apply it themselves.
Q: How long does it take to smoke wings on a pellet grill?
Total cook time is roughly 1.5–2 hours. The low-smoke phase at 225–250°F runs about 45–60 minutes to reach 125°F internal. The high-heat finish at 400–450°F adds another 15–30 minutes to reach 175°F internal. These ranges vary based on wing size, ambient temperature, and your specific grill's heat distribution.
Conclusion
Crispy smoked wings on a pellet grill come down to two things: the prep and the heat. A dry brine (8–24 hours uncovered in the fridge), with or without the baking powder coat, is what makes the skin crispable in the first place. The two-stage cook — 225–250°F to render fat and smoke, then 400–450°F to drive off moisture and build crunch — is what actually crisps it. Everything else, the wood selection, the sauce timing, the thermometer, is execution detail that makes the method more reliable.
The biggest trap is treating wings like a low-and-slow brisket cook. Brisket wants 15 hours at 225°F; wings want a specific sequence. Get the sequence right and any decent pellet grill produces wings that rival what you'd get from a fry setup, without the hot oil.
For related reading, our pellet grill 101 guide covers the fundamentals of getting consistent temperature performance from your setup. The best wood pellets guide goes deeper on which pellet brands actually burn clean and which ones don't. And if you're still shopping for a grill, our pellet grill buying guide lays out what actually matters at each price tier — including which grills are best suited to the high-heat finish this cook requires.